Well it looks like summer is finally here!
As a family we spent Father’s Day at a church picnic then late afternoon we met up with my parents at a Wildfowl and Wetland Trust place called Castle Espie. The girls had a wonderful time, as always, and I didn’t realise until I got home how much sun I’d got. I’m usually a factor 50 person so now I’m kicking myself for not putting any on. To make matters worse I’ve got the sun only on the right side of my legs, arms and neck…not a good look. As I’m radiating away here I promise that I’ll put some on next time I’m outside for any length of time.
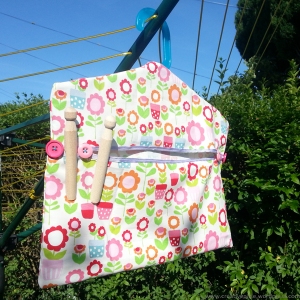
A good thing about this weather is that it means using the tumbler dryer less and hanging out laundry on the washing line more; and laundry can be less of a chore when you’ve got a jazzy peg bag like this. This simple tutorial I’ve created provides the instructions to make a peg bag fit for a domestic goddess.
You will need:
- A clothes hanger
- 1m print fabric
- 1m lilac grosgrain ribbon
- 4 pink buttons (2 large and 2 medium)
- Threads
- Pins
- Scissors
- Sewing machine
Step 1:
Gather together the materials you are going to use for this project. Take measurements of the height and the width of the hanger as these will help when drawing up a template.
Step 2:
Every hanger is different so make up templates that suit your hanger. The pattern requires 3 pieces. As a rule of thumb the width of the template should be 3cm wider than the width of the hanger. Once you are happy with your templates, place them on the fabric and cut out the pieces.
Step 3:
Sew a rolled hem along each opening edge.
Step 4:
Piece the 3 pieces of fabric right sides together and pin around the 5 edges (remembering to leave open the top edge). The front upper and lower edges should meet together, not overlap.
Step 5:
Sew a straight stitch around the pinned edges and then a zig-zag stitch to prevent fraying edges. Turn the sewn fabric right side out and poke out the corners so they sit flat.
Step 6:
Cut 2 pieces of ribbon the same width as the front opening, place on the right side edge of the opening and sew onto the front upper and lower pieces of fabric.
Step 7:
Insert the hanger into the fabric envelope.
Step 8:
Select a contrasting thread to the buttons and then sew the buttons onto the ribbon using whatever spacing suits you. Don’t forget that you can personalise this bag however you see fit – add more or less buttons or ribbons.
Step 9:
You’ve finished, hurrah! Why don’t you grab your pegs and skip outside to hang up your washing 🙂
Lets hope this good weather continues.
Have a great week.
Jean x


too cute my mum would love that!
You are so good at making all these lovely little items. I really hope to start getting some use out of my sewing machine soon, and this looks like a good project for a beginner like me!
Thanks Mel 🙂
This is great! I love the material too. Will give this a go! x
Thanks 🙂 I got the material from http://www.abakhan.co.uk last year.
Ooooh, we need a new peg bag – might have to give this a shot with your easy tutorial, thanks!
thanks for providing the tutorial, it looks so cute and is now perfect weather for getting the washing line out 🙂
Very spiffy! That could almost make laundry fun! 😉
What a cute little bag! I love hanging my washing out, but sadly I love in Scotland so it’s kind of a once-a-year occurrence 😉
Same here for Belfast, I hang my washing out maybe 3 or 4months of the year and the rest of the year I use my tumble dryer.
I too live in Scotland and put washing out nearly every week, we get good breezes to speed up the drying.